引言
从deepseek大火到现在也已经有段时间了,笔者在三月份的时候也为了研究deepseek开源的专为MoE设计的通信库deepEP搞得焦头烂额过一段时间,当时也在各个网上搜过nvshmem对应的源码解析,感觉缺少一篇和deepEP关系紧密的nvshmem介绍的文章。笔者也是终于抽出时间,理了一下自己这一个多月来对于nvshmem的理解,顺便也留了点坑希望有懂行的朋友可以解答,如有错误,请大家见谅!
注:本篇中对于nvshmem的介绍针对的是ibrc的收发模式,与最火的ibgda是两套不同的底层通信方式,想了解ibgda的朋友可以注意下,以免引起混淆。
deepEP中的nvshmem
在详细介绍之前,先简单介绍下nvshmem具体在deepEP中做了什么。nvshmem本质上起到的作用,是替代了nccl负责底层网络通信。虽然大致上,整体流程与NCCL类似,包含建链、收发等部分。然而,NVSHMEM比起NCCL存在很大的不同,在NCCL中,通信实际上实现的是send\recv操作,通过在两边收发时维护类似transmitted、done等指针,来实现收发端的同步,其中,send端下发的wr一定会和recv端的一个wr一一对应。然而在NVSHMEM里,则完全不一样,收发完全是单边操作,由发送端直接往接收端执行put,或由接收端直接执行get,在deepEP中,收发端的同步,则是由一个额外的atomic操作来实现,这也是为什么在ibrc传输模式下,nvshmem原生只能用单个qp进行收发,详细逻辑介绍在下文中。
nvshmem ibrc概述
在介绍deepEP是如何调用nvshmem前,先详细介绍下nvshmem内部ibrc模式是如何实现的。
nvshmem ibrc建链
在ibrc中,提供了qp建链的对应接口,例如ep_create(…)与ep_count(…)等等,此处的ep也就是我们常说的qp。在函数nvshmemt_ibrc_connect_endpoints(…)进行具体的nvshmem的pe(processing element,等价于nccl中的rank)的建链。
需要注意的是,原生NVSHMEM只支持使用单个qp,这点很重要,具体的原因会在下文介绍,此处可以先记下来。在nvshmemt_ibrc_connect_endpoint(…)中,首先会选择上层传下来的,选取的selected_dev_id(具体如何选取网卡的,可以自行查看src/host/transport/transport.cpp中的nvshmemi_setup_connections(…),此处不加以赘述),在其上根据pes的数量以及设定的ep_count数量建立qp(虽然建立了多个,但其实只用一个,nvshmem的代码写的真的很奇怪,好多的宏甚至重定义加不使用。。。)
`// src/modules/transport/ibrc/ibrc.cpp:nvshmemt_ibrc_connect_endpoints(…)
int nvshmemt_ibrc_connect_endpoints(nvshmem_transport_t t, int ***selected_dev_ids, int num_selected_devs) { // … … if (num_selected_devs > 1) { INFO(ibrc_state->**log_level, “IBRC only supports One NIC / PE. All other NICs will be ignored.”); }
*// ... ...*
for (int j = 0; j < n_pes; j**++) { for (int k = 0; k < ep_count; k++) { nvshmemt_ibrc_ep_create(&ibrc_state->ep[j ***** ep_count + k], ibrc_state->selected_dev_id, t, ibrc_state); NVSHMEMI_NZ_ERROR_JMP(status, NVSHMEMX_ERROR_INTERNAL, out, “transport create ep failed \n”); status = nvshmemt_ibrc_ep_get_handle(&local_ep_handles[j ***** ep_count + k], ibrc_state->**ep[j ***** ep_count + k]); NVSHMEMI_NZ_ERROR_JMP(status, NVSHMEMX_ERROR_INTERNAL, out, “transport get ep handle failed \n”); } }
*// ... ...*
}`
随后,通过bootstrap网络进行一次alltoall,获取其余的pe建立的qp对应的handle,其中包含对应建链所需的信息,为了后续执行connect服务
`status **=** t**->**boot_handle**->**alltoall((**void** *****)local_ep_handles, (**void** *****)ep_handles,
                                  **sizeof**(**struct** **ibrc_ep_handle**) ***** ep_count, t**->**boot_handle);
NVSHMEMI_NZ_ERROR_JMP(status, NVSHMEMX_ERROR_INTERNAL, out,
                      "allgather of ep handles failed \\n");`
在交换得到了其他pe对应的ep信息后,执行connect操作,随后,ep建链正式完成
`// src/modules/transport/ibrc/ibrc.cpp:nvshmemt_ibrc_connect_endpoints(…)
int nvshmemt_ibrc_connect_endpoints(nvshmem_transport_t t, int ****selected_dev_ids, int num_selected_devs) {
// … … for (int j = 0; j < n_pes; j**++**) { for (int k = 0; k < ep_count; k*++) { status = nvshmemt_ibrc_ep_connect(ibrc_state->**ep[j ***** ep_count + k], **&**ep_handles[j ***** ep_count + k]); NVSHMEMI_NZ_ERROR_JMP(status, NVSHMEMX_ERROR_INTERNAL, out, “transport create connect failed \n”); } } // … … }`
nvshmem ibrc rma(rdma put & get)
nvshmem中的rdma传输,直接实现了rdma的put与get,不需要对端的参与,在收发时,根据是否启用proxy,选取ep,填充wr信息,根据上层传入的verb类型决定对应的wr type为IBV_WR_RDMA_WRITE或IBV_WR_RDMA_READ,随后调用ibv_post_send(…)进行发送。整体逻辑与NCCL的ncclIbIsend并无区别,在此不进行赘述。
nvshmem ibrc amo(rdma atomic)
nvshmem中的amo操作,在我看来,起到的是nvshmem ibrc收发中的核心,如上所示,nvshmem中,对应的收发不做任何的同步,完全是单边操作,因此,便引入了amo操作来做所谓的同步机制。
amo代码如下,其中选取了与rma操作中相同的同一个qp,根据上层传入的verb类型,填充wr信息,将其下发到qp中,本质amo操作往往起到的作用是类似累加某个具体的index,用来同步收发端收发位置。为什么原生nvshmem只支持单个qp的原因也是在于,需要确保amo操作执行时,前面的rma操作已经全部完成,若使用多个qp,则执行amo操作时,不能保证之前的rma操作以及全部完成,则会出现数据出错的问题!
`int nvshmemt_ibrc_amo(struct nvshmem_transport *****tcurr, int pe, void *****curetptr, amo_verb_t verb, amo_memdesc_t *****remote, amo_bytesdesc_t bytesdesc, int is_proxy) { int status = 0; transport_ibrc_state_t *****ibrc_state = (transport_ibrc_state_t ***)tcurr->**state; struct ibrc_ep *****ep; struct ibv_send_wr *****sr, ******bad_sr; struct ibv_sge *****sge; int op_id; struct ibrc_atomic_op op;
**if** (is_proxy) {
    ep **=** ibrc_state**->**ep[(ibrc_state**->**ep_count ***** pe **+** ibrc_state**->**proxy_ep_idx)];
} **else** {
    ep **=** ibrc_state**->**ep[(ibrc_state**->**ep_count ***** pe)];
}

status **=** check_poll_avail(ep, WAIT_ANY);
NVSHMEMI_NZ_ERROR_JMP(status, NVSHMEMX_ERROR_INTERNAL, out, "check_poll failed \\n");

op_id **=** ep**->**head_op_id **&** IBRC_REQUEST_QUEUE_MASK;  *// ep->head_op_id % ibrc_qp_depth*
sr **=** **&**(ep**->**req **+** op_id)**->**sr;
bad_sr **=** **&**(ep**->**req **+** op_id)**->**bad_sr;
sge **=** **&**(ep**->**req **+** op_id)**->**sge;

memset(sr, 0, **sizeof**(ibv_send_wr));
memset(sge, 0, **sizeof**(ibv_sge));

sr**->**num_sge **=** 1;
sr**->**sg_list **=** sge;
sr**->**wr_id **=** NVSHMEMI_OP_AMO;
sr**->**next **=** NULL;

**if** (use_ib_native_atomics) {
    **if** (verb.desc **==** NVSHMEMI_AMO_SIGNAL_ADD) {
        **if** (bytesdesc.elembytes **==** 8) {
            sr**->**opcode **=** IBV_WR_ATOMIC_FETCH_AND_ADD;
            sr**->**send_flags **=** IBV_SEND_SIGNALED;

            sr**->**wr.atomic.remote_addr **=** (**uint64_t**)remote**->**remote_memdesc.ptr;
            assert(remote**->**remote_memdesc.handle);
            sr**->**wr.atomic.rkey **=**((**struct** **nvshmemt_ib_common_mem_handle** *****)remote**->**remote_memdesc.handle)**->**rkey;
            sr**->**wr.atomic.compare_add **=** remote**->**val;

            sge**->**length **=** bytesdesc.elembytes;
            sge**->**addr **=** (uintptr_t)dummy_local_mem**->**ptr;
            sge**->**lkey **=** dummy_local_mem**->**mr**->**lkey;
            **goto** post_op;
        }
    }
}
#ifdef NVSHMEM_USE_GDRCOPY // if gdrcopy is available, use it for all atomics to guarantee // atomicity across different ops if (use_gdrcopy) { ibrc_mem_handle_info_t *****mem_handle_info;
    *// assuming GDRCopy availability is uniform on all nodes*
    op.op **=** verb.desc;
    op.addr **=** remote**->**remote_memdesc.ptr;
    op.retaddr **=** remote**->**retptr;
    op.retflag **=** remote**->**retflag;
    op.compare **=** remote**->**cmp;
    op.swap_add **=** remote**->**val;
    op.elembytes **=** bytesdesc.elembytes;

    *// send rkey info*
    **if** (verb.desc **>** NVSHMEMI_AMO_END_OF_NONFETCH) {
        mem_handle_info **=** get_mem_handle_info(tcurr, remote**->**retptr);
        op.retrkey **=** mem_handle_info**->**mr**->**rkey;
    }

    sr**->**opcode **=** IBV_WR_SEND;
    sr**->**send_flags **=** IBV_SEND_SIGNALED **|** IBV_SEND_INLINE;
    sge**->**length **=** **sizeof**(**struct** **ibrc_atomic_op**);
    assert(sge**->**length **<=** IBRC_BUF_SIZE);
    sge**->**addr **=** (uintptr_t)**&**op;
    sge**->**lkey **=** 0;

    atomics_issued**++**;
    TRACE(ibrc_state**->**log_level, "[%d] atomic issued : %lu \\n", getpid(), atomics_issued);
    **goto** post_op;
}
#endif
**if** (use_ib_native_atomics) {
    **if** (verb.desc **==** NVSHMEMI_AMO_ADD) {
        **if** (bytesdesc.elembytes **==** 8) {
            sr**->**opcode **=** IBV_WR_ATOMIC_FETCH_AND_ADD;
            sr**->**send_flags **=** IBV_SEND_SIGNALED;

            sr**->**wr.atomic.remote_addr **=** (**uint64_t**)remote**->**remote_memdesc.ptr;
            assert(remote**->**remote_memdesc.handle);
            sr**->**wr.atomic.rkey **=**((**struct** **nvshmemt_ib_common_mem_handle** *****)remote**->**remote_memdesc.handle)**->**rkey;
            sr**->**wr.atomic.compare_add **=** remote**->**val;

            sge**->**length **=** bytesdesc.elembytes;
            sge**->**addr **=** (uintptr_t)dummy_local_mem**->**ptr;
            sge**->**lkey **=** dummy_local_mem**->**mr**->**lkey;
            **goto** post_op;
        }
    } **else** **if** (verb.desc **==** NVSHMEMI_AMO_SIGNAL **||** verb.desc **==** NVSHMEMI_AMO_SIGNAL_SET) {
        sr**->**opcode **=** IBV_WR_RDMA_WRITE;
        sr**->**send_flags **=** IBV_SEND_SIGNALED;
        sr**->**send_flags **|=** IBV_SEND_INLINE;

        sr**->**wr.rdma.remote_addr **=** (**uint64_t**)remote**->**remote_memdesc.ptr;
        assert(remote**->**remote_memdesc.handle);
        sr**->**wr.rdma.rkey **=**((**struct** **nvshmemt_ib_common_mem_handle** *****)remote**->**remote_memdesc.handle)**->**rkey;

        sge**->**length **=** bytesdesc.elembytes;
        sge**->**addr **=** (uintptr_t)**&**remote**->**val;
        sge**->**lkey **=** 0;
        **goto** post_op;
    }
}

NVSHMEMI_ERROR_EXIT("RMA/AMO verb %d not implemented\\n", verb.desc);
post_op: status = ibv_post_send(ep**->**qp, sr, bad_sr); NVSHMEMI_NZ_ERROR_JMP(status, NVSHMEMX_ERROR_INTERNAL, out, “ibv_post_send failed \n”);
ep**->**head_op_id**++**;
out: return status; }`
deepEP与nvshmem
很多人可能会好奇,在deepEP中,是如何通过调用接口,转到执行nvshmem中对应的rma与amo操作的。在deepEP中,主要通过调用如下的两个函数实现:
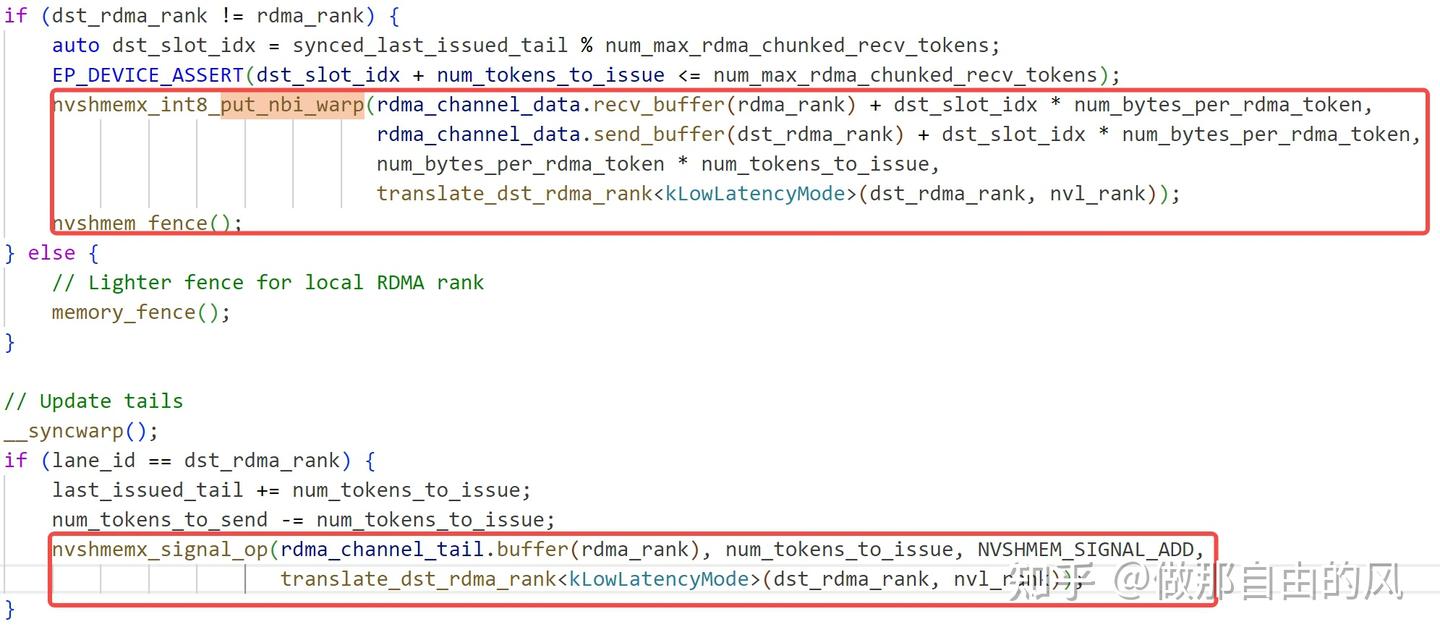
其中,nvshmemx_int8_put_nbi_warp(…)即rma操作的上层接口,nvshmemx_signal_op(…)即amo操作的上层接口,可以看到,在deepEP中,先调用rma操作,随后调用amo操作进行同步。
下面我将详细介绍对应这两个接口如何在nvshmem内部调用实现rma与amo操作。
nvshmemx_int8_put_nbi_warp
nvshmemx_int8_put_nbi_warp的声明与定义如下所示,可以看到,nvshmemx_int8_put_nbi_warp(…)本质上是调用nvshmemi_put_nbi_threadgroup(…)实现
`// declaration **#define NVSHMEMX_DECL_TYPE_PUT_NBI_THREADGROUP(NAME, TYPE) \ device void nvshmemx_#name_put_nbi_warp(TYPE *dest, const TYPE *source, size_t nelems, \ int pe); \ device void nvshmemx_#name_put_nbi_block(TYPE dest, const TYPE source, size_t nelems, \ int pe);
NVSHMEMI_REPT_FOR_STANDARD_RMA_TYPES(NVSHMEMX_DECL_TYPE_PUT_NBI_THREADGROUP) #undef NVSHMEMX_DECL_TYPE_PUT_NBI_THREADGROUP
// definition #define NVSHMEM_TYPE_PUT_NBI_THREADGROUP(Name, Type, Group) \ NVSHMEMI_DEVICE_PREFIX NVSHMEMI_DEVICE_ALWAYS_INLINE void nvshmemx_#name_put_nbi_group( \ Type *dest, const Type *source, size_t nelems, int pe) { \ nvshmemi_put_nbi_threadgroup<Type, nvshmemi_threadgroup_#group>(dest, source, nelems, \ pe); \ }`
nvshmemi_put_nbi_threadgroup(…)则直接通过调用nvshmemii_put_nbi_threadgroup(…)实现。在nvshmemii_put_nbi_threadgroup(…)中,则调用nvshmemi_transfer_rma_nbi(…)去生成对应的rma请求。在nvshmemi_transer_rma_nbi(…)中,直接调用nvshmemi_proxy_rma_nbi(…)来使用线程生成对应的rma请求,需要注意的是,与ibgda不同,在其中,仅threadgroup(warp/block)中的第一个thread来执行该操作,这也是由于ibrc模式的传输本质使用proxy线程进行控制,不需要像ibgda一样使warp中的所有thread各司其职,因此,仅需要一个thread生成rma request即可。
**template** **<**threadgroup_t SCOPE, nvshmemi_op_t channel_op**>**NVSHMEMI_TRANSFER_STATIC __device__ NVSHMEMI_TRANSFER_INLINE **void** nvshmemi_transfer_rma_nbi( **void** *****rptr, **void** *****lptr, size_t bytes, **int** pe) { **#ifdef NVSHMEM_IBGDA_SUPPORT** ... ... **#endif** { **int** myIdx **=** nvshmemi_thread_id_in_threadgroup**<**SCOPE**>**(); **if** (**!**myIdx) nvshmemi_proxy_rma_nbi(rptr, lptr, bytes, pe, channel_op); } }
nvshmemi_proxy_rma_nbi(…)直接调用transfer_dma(…)下发rma请求。在transfer_dma(…)中,我们生成了四个request,将这些request存入proxy_channels_buff(一个可理解为环式buff),这些request中存放对应的rma所需的信息,以在proxy中获取,对应四个requests存放内容如下:
`NVSHMEMI_STATIC NVSHMEMI_DEVICE_ALWAYS_FORCE_INLINE device void transfer_dma( void *****rptr, void *****lptr, size_t bytes, int pe, int channel_op) { // … … void *****buf_ptr = nvshmemi_device_state_d.proxy_channels_buf; // … …
req **=** (**uint64_t** *****)((**uint8_t** *****)buf_ptr **+** (idx **&** (CHANNEL_BUF_SIZE **-** 1)));
**uint64_t** curr_flag **=** **!**((idx **>>** nvshmemi_device_state_d.proxy_channel_buf_logsize) **&** 1);
*// ... ...*

*/* base_request_t
 * 32 | 8 | 8 | 8 | 8
 * roffset_high | roffset_low | op | group_size | flag */// ... ...*

*/* put_dma_request_0
 * 56 | 8
 * laddr_high | flag */// ... ...*

*/* put_dma_request_1
 * 32 | 16 | 8 | 8
 * size_high | size_low | laddr_low | flag */// ... ...*

*/* put_dma_request_2
 * 32 | 16 | 8 | 8
 * recv2 | pe | resv1 | flag */// ... ...*
}`
而当对应的requests存入buff中后,我们可以在proxy progrss中,通过progress_channels(…)中获取的channel_req[i]->op类型,调用process_channel_dma(…)操作来真正执行rma操作,process_channel_dma(…)函数则通过类似transfer_dma(…)存取request的方式,依次拿到四个requests,调用nvshmemi_process_multisend_rma(…)函数,在其中执行status = tcurr->host_ops.rma(…),也即ibrc中真正的rma,至此,deepEP中的put_nbi_warp到nvshmem中的rma的完整调用链已经介绍完成。
`static inline void nvshmemi_process_multisend_rma(struct nvshmem_transport *****tcurr, int transport_id, int pe, rma_verb_t verb, void *****rptr, void *****lptr, size_t size, bool is_proxy) { // … …
**while** (size_remaining) {
    *// ... ...*
    status **=** tcurr**->**host_ops.rma(tcurr, pe, verb, **&**remotedesc, **&**localdesc, bytes, is_proxy);
    **if** (unlikely(status)) {
        NVSHMEMI_ERROR_PRINT("aborting due to error in process_channel_dma\\n");
        exit(**-**1);
    }
    size_remaining **-=** chunk_size;
    lptr **=** (**char** *****)lptr **+** chunk_size;
    rptr **=** (**char** *****)rptr **+** chunk_size;
}
}`
nvshmemx_signal_op
nvshmemx_signal_op(…)的实现相比put_nbi_warp(…)更为简洁,具体来说,nvshmemx_signal_op(…)直接调用nvshmemi_signal_op(…)实现,而nvshmemi_signal_op(…)则直接调用nvshmemi_transfer_amo_nonfetch(…),随后进一步调用nvshmemi_proxy_amo_nonfetch(…)函数,在该函数里,直接调用amo(…)函数
`NVSHMEMI_DEVICE_PREFIX NVSHMEMI_DEVICE_ALWAYS_INLINE void nvshmemx_signal_op(uint64_t *****sig_addr, uint64_t signal, int sig_op, int pe) { nvshmemi_signal_op(sig_addr, signal, sig_op, pe); }
device NVSHMEMI_DEVICE_ALWAYS_INLINE void nvshmemi_signal_op(uint64_t *****sig_addr, uint64_t signal, int sig_op, int pe) { const void *****peer_base_addr =(void *****)__ldg((const long long unsigned *)nvshmemi_device_state_d.peer_heap_base_p2p + pe); if (sig_op == NVSHMEMI_AMO_SIGNAL_SET && peer_base_addr != NULL) { // … … } else if (nvshmemi_device_state_d.job_connectivity <= NVSHMEMI_JOB_GPU_LDST) { // … … } else { nvshmemi_transfer_amo_nonfetch<uint64_t>((void *****)sig_addr, signal, pe, (nvshmemi_amo_t)sig_op); } }
NVSHMEMI_TRANSFER_STATIC device NVSHMEMI_TRANSFER_INLINE void nvshmemi_transfer_amo_nonfetch( void ****rptr, T value, int pe, nvshmemi_amo_t op) { #ifdef NVSHMEM_IBGDA_SUPPORT if (nvshmemi_device_state_d.ibgda_is_initialized) { nvshmemi_ibgda_amo_nonfetch**<T>**(rptr, value, pe, op); } else#endif { nvshmemi_proxy_amo_nonfetch*<T>**(rptr, value, pe, op); } }
template <typename T**>**NVSHMEMI_STATIC device NVSHMEMI_DEVICE_ALWAYS_INLINE void nvshmemi_proxy_amo_nonfetch( void *rptr, T swap_add, int pe, nvshmemi_amo_t op) { amo<T>(rptr, 0 / dummy value /, swap_add, 0, pe, op); }`
在amo(…)中,我们实现类似transfer_dma(…)类似的事。我们同样在amo(…)函数中生成四个requests,具体的定义如下:
`template <typename T**>**NVSHMEMI_STATIC device NVSHMEMI_DEVICE_ALWAYS_INLINE void amo( // … …
*/* base_request_t
 * 32 | 8 | 8 | 8 | 8
 * roffset_high | roffset_low | op | group_size | flag */// ... ...*

*/* amo_request_0
 * 32 | 16 | 8 | 8
 * swap_add_low | pe | amo | flag */// ... ...*

*/* amo_request_1
 * 32 | 16 | 8 | 8
 * swap_add_high | size | compare_low | flag */// ... ...*

*/* amo_request_2
 * 32 | 16 | 8 | 8
 * comapare_high | flag */// ... ...*

*/* amo_request_3
 * 32 | 16 | 8 | 8
 * g_buf_counter_low | flag */// ... ...*
}`
在proxy中,我们使用proxy_channel_amo(…)来执行amo操作。我们依次获取amo中生成的四个request,获取amo操作所需的参数,调用tcurr->host_ops.amo(…)来执行,也即我们所说的nvshmemt_ibrc_amo(…)。
**int** **process_channel_amo**(proxy_state_t *****state, proxy_channel_t *****ch, **int** *****is_processed) { *// ... ...* status **=** tcurr**->**host_ops.amo(tcurr, pe, NULL, verb, **&**memdesc, bytes, 1); *// ... ...* }
结语
本文笔者大致总结了一下deepEP中nvshmem ibrc的内容,主要包括rma与amo的关系以及deepEP中的接口如何一步步执行到nvshmem中对应的rma与amo,期望能给同样研究deepEP的同行一点帮助,另外,后续有空的话也会更新ibgda和low_lantency相关的东西,敬请期待。